


Optics Playground
Introduction
Optical equipment is expensive and delicate, it requires great care to work with. To acquaint us with the subtleties handling and aligning the equipment we were presented with two challenges. These challenges introduced us to the basic rules and techniques of optical equipment.
Challenge 1: Alignment
Instructions:
Set up a situation as shown in Figure 1. Parallel a laser beam with the table and send through an optical lens attached to a fiber optic cable. Maximize the light coming through the fiber optic cable.
Equipment:
- HeNe laser
- 2 mirrors
- 2 irises
- Lens
- Fiber optic cable
- Index card
- Screws
- Dogs (to secure the equipment to the table)
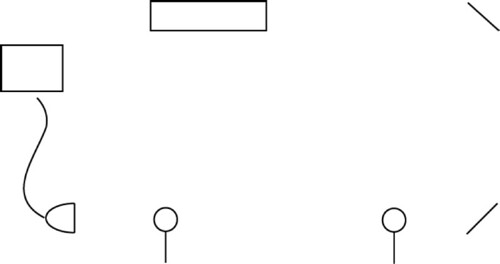
Figure 1: Diagram of the optics playground as set up for aligning the lens
Setup:
- Attach the laser to the table trying to make it as parallel as possible.
- If your being extra careful you can set up two irises and try to attach the laser in a position where it will go through both, however the two mirrors we will set up next are there to parallel the beam with the table so this is not absolutely necessary.
- Setup the two mirrors as shown in Figure 1.
- Make sure to dog the equipment down (secure it to the table).
- Set up the two irises as shown in Figure 1.
- Make sure the two irises are at the same level (at your chosen beam height)
- Use two screws, positioned parallel to the beam to place each iris. By butting the iris up against the screws this will ensure the beam is parallel.
- Pair the mirrors and the irises so that you adjust mirror 1 to send the beam through iris 1 and you adjust mirror 2 to send the beam through iris 2.
- Working systematically, adjust the two mirrors so that the beam travels straight down the table through both irises.
- Adjust the mirrors one at a time, making sure to only use the mirror paired with each iris.
- You will have to go back and forth numerous times until the beam goes through both.
- To double check you should move iris 1 to position 2 and make sure the beam is still aligned (just in case there were any differences in the high of the two irises).
- Align the lens with the beam so that the light coming out of the fiber optic cable is maximized.
- The focus of the lens is very small; the slightest adjustment can either align the lens with the beam. This step can be very tedious and frustrating, but it is possible so just keep working at it.
Challenge 2: Mach-Zehnder
Instructions:
Find interference fringes using a Mach-Zehnder Interferometer.
Equipment:
- HeNe laser
- 1 concave lens
- 1 convex lens
- 3 mirrors
- 1 mirror on a mount that allows movement (perpendicular to the mirror)
- 2 beam splitters (polarizing)
- 1 polarizer
- 1 half-wave plate
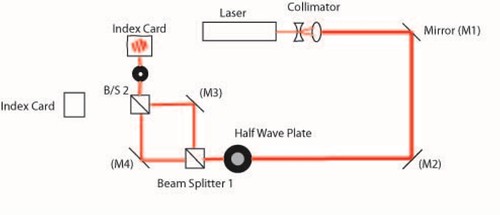
Figure 2: Diagram of Optics Playground interferometer
Setup:
- Use the setup from challenge 1, but remove the lens.
- Insert the concave lens and convex lens to create a collimator.
- This will enlarge the beam making it easier to see the fringes
- Insert the first beam splitter
- Because we are using a polarizing beam splitter the two paths will be distinct in their oscillations
- Set up mirror 3 as shown in figure 2.
- Measure the distance between the beam splitter and the mirror.
- Set up mirror 4 at the same distance along the other arm of the interferometer
- Set up the second beam splitter at the same distance from each mirror so that the interferometer forms a square
- The path length along each arm should be as equal as possible. While using a HeNe laser, the coherence length of the beam is very long, but as we are learning to set up for a laser with a much smaller coherence length we want to be as accurate as possible.
- Using a index card adjust the beams so they are collinear (traveling along the same path)
- list item
- To do this you must be able to move the index card.
- Use one of the mirrors to align the beams close to the beam splitter and the other to align the beams far away.
- Once the beams are collinear, insert the polarizer after the second beam splitter
- The polarizer is necessary to force the beams to oscillate in the same direction, and interfere. After it has been inserted you should be able to see interference.
- To explain the situation using quantum mechanics, by inserting the polarizer we are erasing the possibility of knowing which path the light traveled.
- After finding the fringes you can make subtle adjustments to the movable stage, which changes the path length of one arm, and you will see the fringes shift.
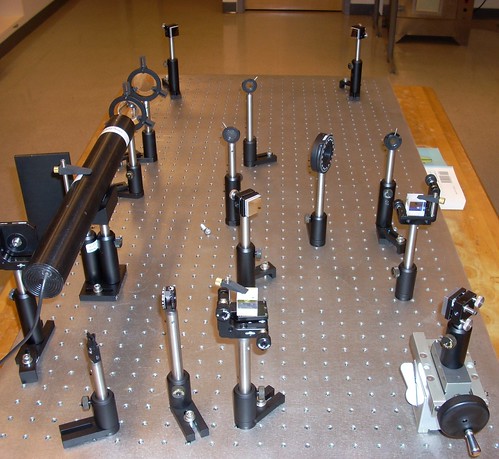
Figure 3: Picture of our Optics Playground, set up for the interferometer
Important Rules of Optical Equipment:
- Remove all jewelry when working with the laser.
- Dog down all equipment.
- The height of the beam should be chosen so that all elements can be adjusted up and down around it.
- Little adjustments can fix or ruin everything.
- Make adjustments to equipment in order, starting at the laser.
page revision: 10, last edited: 29 Apr 2009 01:22


